Launching a new product with Amazon PPC is not the same as optimizing a mature listing. In this chapter, you will follow a calm, repeatable launch framework that builds keyword rank and reviews first, then transitions you toward breakeven and profitability.
The goal is simple: spend with intention early, collect the data and conversions you need, then tighten efficiency at the right time. When your structure is clean, your results compound.
You will also learn how to optimize during launch without overreacting to incomplete data, including how to handle conversion and reporting delays, and how to build a weekly routine that adapts as your listing gains traction.
Key Takeaways
- A launch needs a different target ACoS than a mature product because your conversion rate is lower before reviews build.
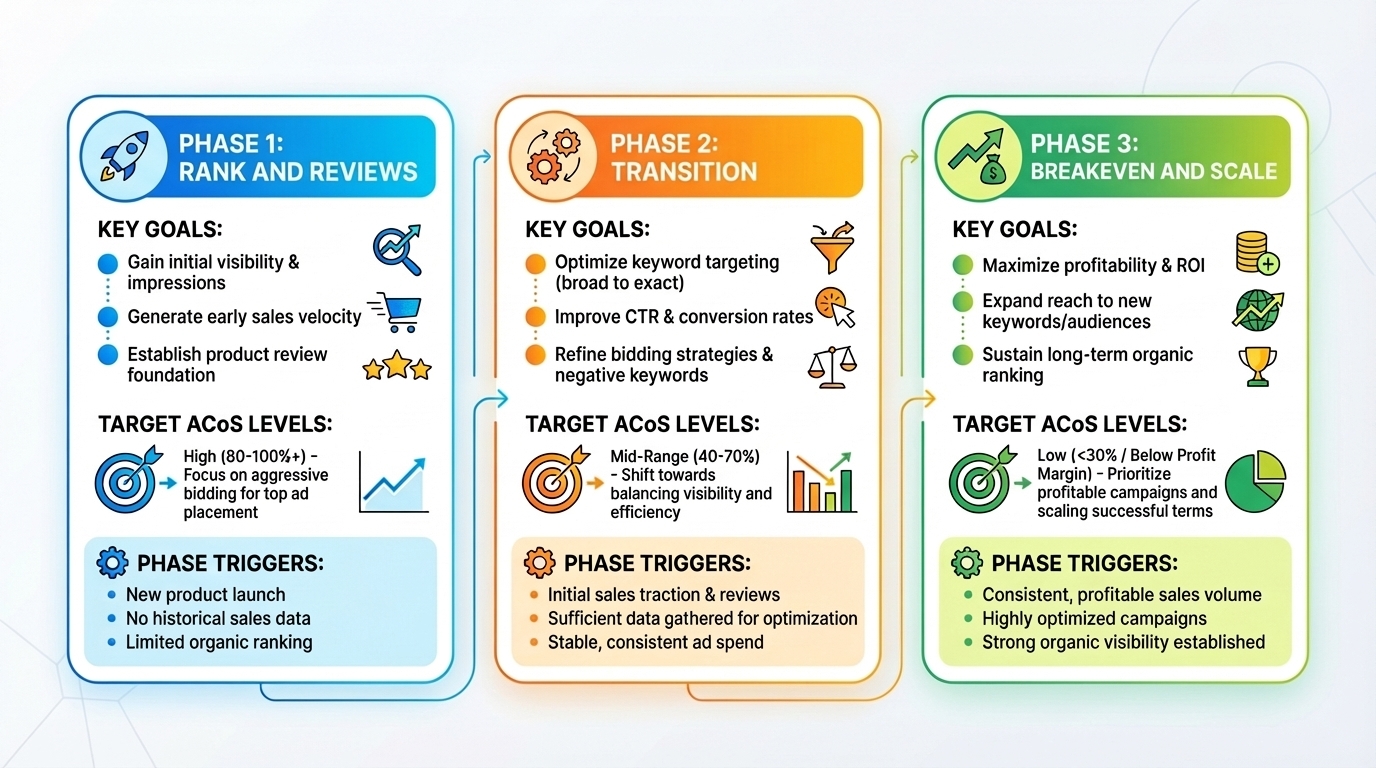
- Use a three-phase plan: Phase 1 focuses on rank and early reviews, Phase 2 transitions toward breakeven, and Phase 3 prioritizes sustained breakeven and scalable growth.
- Phase 1 is usually aggressive, but it should be measured with a clear target ACoS, not emotional spending.
- Avoid optimizing too early. Let campaigns run long enough for purchases to catch up with clicks.
- Start optimizing after your first sales, then expand your lookback window each week until you reach a stable 60-day routine.
- Use SellerSprite Seller Tools for better keyword and competitor inputs, enabling faster launch learning and reduced wasted clicks.
Table of Contents
The Three-Phase PPC Launch Framework
A clean launch plan removes guesswork. Instead of asking "Should I be aggressive?" you set a measured target ACoS and a clear exit rule for each phase. This keeps your decision-making consistent, even when your product has very few reviews.
Launch mindset
Early launch PPC is an investment phase. You are buying learning, ranking, and review momentum. Later, you convert that momentum into efficiency.
Phase 1: Rank and reviews
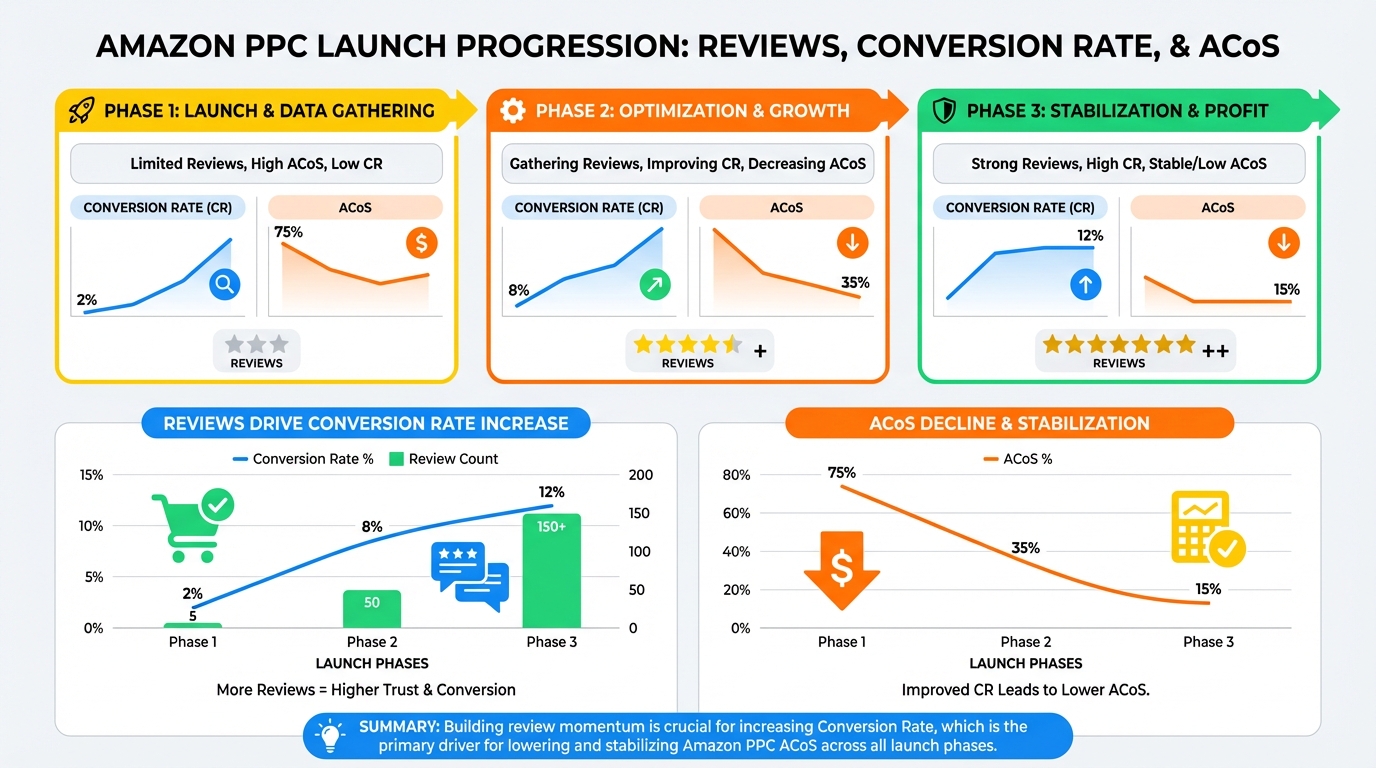
Phase 1 begins when your listing goes live and focuses on two priorities: ranking for keywords and obtaining initial reviews. Low reviews lead to lower conversion rates, making early campaigns appear costly even when optimized.
Target ACoS posture
A practical Phase 1 target ACoS is often 2 times your breakeven ACoS. Example: if breakeven is 30%, Phase 1 target ACoS is 60%.
When Phase 1 ends
Phase 1 ends when you reach a meaningful review count, such as 20 reviews. For less competitive products, 10 may be enough; in highly competitive categories, up to 50 may be required. More reviews provide needed social proof for better conversion.
Phase 2: Transition to breakeven
After building a base of reviews and keyword traction, avoid abruptly cutting spending. Phase 2 is a controlled shift from aggressive to efficient.
Target ACoS posture
A practical Phase 2 target ACoS is often 1.5 times your breakeven ACoS. Example: if breakeven is 30%, Phase 2 target ACoS is 45%.
Suggested duration
Phase 2 typically lasts about 30 days, allowing conversion rates to stabilize and optimization to rely on more representative data.
Phase 3: Breakeven and scale
In Phase 3, your listing is established on several keywords, with enough reviews to maintain conversion rates. The goal now is to reach or beat breakeven, focus on rank, control spending, and scale successful campaigns.
Target ACoS posture
A practical Phase 3 target ACoS is breakeven. Example: if breakeven is 30%, Phase 3 target ACoS is 30%.
Common mistake
Do not treat Phase 1 data like Phase 3 data. A keyword can look unprofitable early and become profitable later as your reviews and conversion rate improve.
Which Campaigns to Launch and When
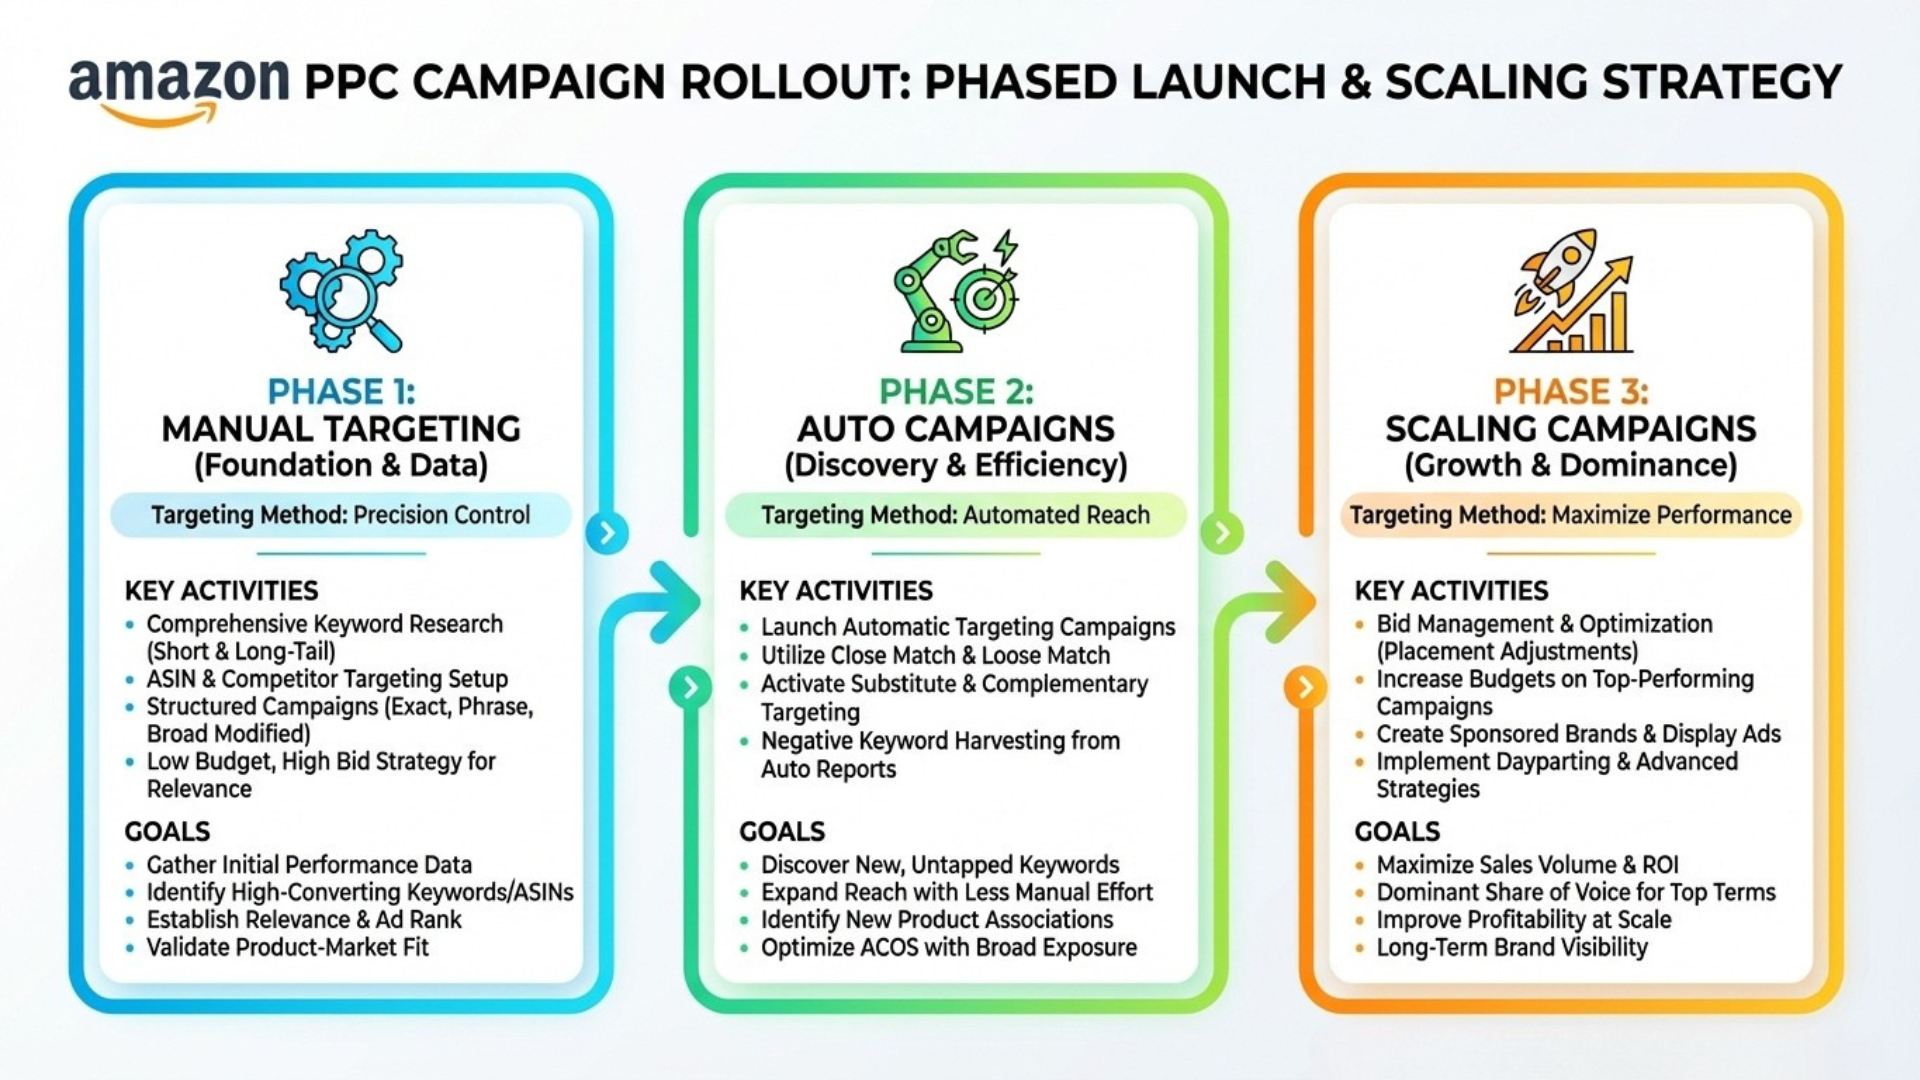
A launch does not require every campaign type at once. Instead, evolve campaign layers across phases: start with core, learning-focused campaigns, then expand gradually as your listing matures and gains reliable data.
Sponsored Products launch checklist by phase
| Phase | Primary goal | Campaigns to prioritize | Notes |
|---|---|---|---|
| Phase 1 | Rank and early reviews | Manual keyword campaigns (Exact, Phrase, Broad), product targeting (competitors and complementary), misspellings | Focus on high-intent keywords and clean targeting. Keep structure simple. |
| Phase 2 | Controlled transition | Auto campaign, optional category targeting if highly relevant | Auto performs better after Amazon has more conversions and keyword data. |
| Phase 3 | Breakeven and scale | Catch-all coverage portfolio, additional expansion campaigns based on proven data | Add scale layers only when the core structure is stable. |
Common mistake
Avoid launching an auto campaign on day one. Auto targeting improves when Amazon has more information about who buys your product and which search terms convert.
If you are brand-registered: Sponsored Brands and Sponsored Display
Sponsored Products usually carry the majority of launch spend, even for brand-registered sellers. Still, brand-registered accounts can add helpful coverage with Sponsored Brands and Sponsored Display.
Sponsored Brands priorities
- Start with highly targeted, exact keyword campaigns.
- Add highly targeted competitor product campaigns for the most relevant ASINs.
- Use video ads early if you have strong creative because video can reduce buyer hesitation when reviews are still low.
Sponsored Display priorities
- Prioritize targeting similar and complementary products first.
- Consider category targeting after Phase 2 if you find categories that truly match buyer intent.
- Consider retargeting audiences after you have enough traffic and reviews to convert consistently.
How to Optimize PPC During Product Launch
Launch optimization requires patience. Clicks can turn into purchases days later, and Campaign Manager data is often unstable in the most recent window. If you optimize too early, you may cut targets that were about to convert.
Two launch realities
- Purchases can lag behind clicks. Launch data needs time to settle.
- Recent reporting can be inconsistent. Avoid making heavy decisions based on only the most recent 2 days.
When you should start optimizing
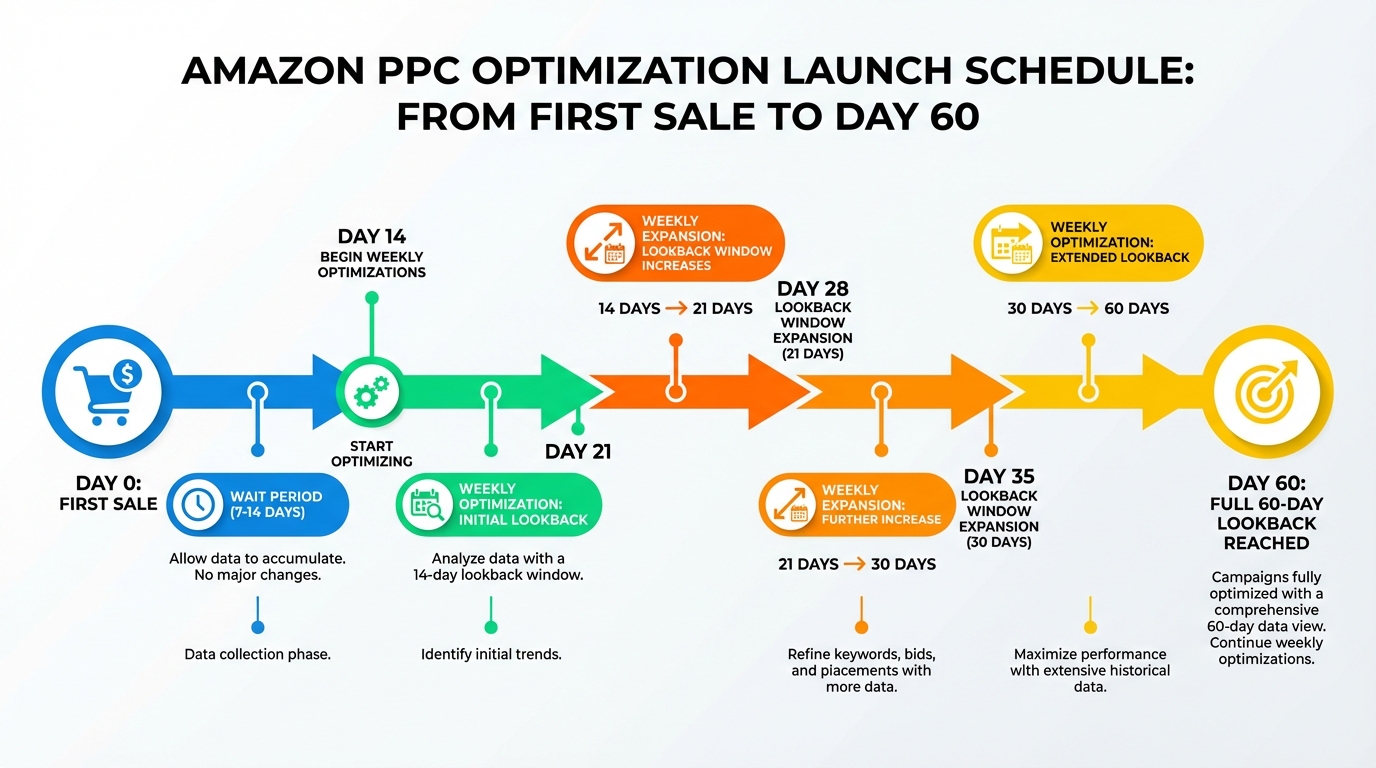
Let campaigns run without changes for at least 7 days after your first sale. A more conservative rule is 14 days after your first sale. During this window, focus on clean structure and accurate targeting, not constant edits.
Launch control tip
Use fixed or dynamic bids, but set them down only during launch to keep spend predictable and targeting controlled.
How your lookback window should grow
Once you begin optimizing, increase your lookback window each week. Example: start with the last 14 days, then 21 days the following week, then 30 days, and keep expanding until you reach a stable 60-day routine.
Motivational reminder
A launch is not won in two days. Your job is to stay consistent long enough for data to become trustworthy, then make clean decisions.
Launch Bid Rules You Can Run Weekly
Once your campaigns have run long enough to produce meaningful signals, use a simple weekly routine. The point is to reduce waste without shutting down learning, while scaling what is clearly working.
Rule 1: Reduce bids on targets with clicks but no sales
If a keyword or product target has 11 or more clicks and zero sales, reduce the bid to a low baseline, typically $0.15-$0.20. This helps stop budget leaks while keeping a small chance to convert at a cheaper cost per click.
Rule 2: Reduce bids on high impression, low CTR targets
If a target has at least 1,000 impressions, a CTR below 0.15%, and zero sales, set the baseline to the same low level. This is a conservative filter that prevents future waste.
Rule 3: Scale winners gently
If a target is converting and its ACoS is below your current phase target, increase its bid carefully to capture more volume.
Simple winner rule
New bid = average CPC × 1.2
Rule 4: Cut losers aggressively
If a target has ACoS above your current phase target, reduce bids in proportion to how far you are from the goal.
Simple loser rule
New bid = (target ACoS ÷ current ACoS) × average CPC
Common mistake
Do not increase bids aggressively during Phase 1 simply to get more impressions. Stay within your phase target ACoS and scale winners step by step.
SellerSprite Workflow for Faster Launch Learning
Your launch performance is heavily influenced by your inputs. Better keyword lists and cleaner competitor targeting reduce wasted spend and shorten the time it takes to find profitable pockets of traffic.
SellerSprite launch workflow
- Build your core list with SellerSprite Keyword Research. Prioritize high-intent search terms for your Exact campaigns.
- Expand with SellerSprite Keyword Mining. Collect long-tail variations for Phrase and Broad discovery under controlled bids.
- Validate with SellerSprite Reverse ASIN. Compare competitor terms to identify gaps and strong ASIN targets.
- Track momentum. Use SellerSprite Product Tracker and Keyword Tracker to monitor rank movement and adjust priorities as you climb.
Comparison and Selection
Use this table to decide what to prioritize based on where your launch is right now.
| Situation | What to do next | Target ACoS posture | Why it works |
|---|---|---|---|
| New listing with few reviews | Run Phase 1 campaign stack and focus on clean targeting | Up to 2 times breakeven | Buys learning, rank movement, and review momentum |
| You reached a solid review base | Begin Phase 2 and add an auto campaign with disciplined optimization | Around 1.5 times breakeven | Transitions to efficiency without cutting future winners too early |
| Stable rankings and consistent conversion | Enter Phase 3, tighten bids, and add scale layers like catch-all coverage | Breakeven | Maintains growth while protecting profitability and long-term stability |
Examples and Templates
Example 1: Phase targets worksheet
Copy and paste template
Breakeven ACoS: ________ percent
Phase 1 target ACoS: breakeven × 2
Phase 2 target ACoS: breakeven × 1.5
Phase 3 target ACoS: breakeven × 1
Example 2: Campaign naming convention for launch
Copy and paste the naming rule
[Product] | [Phase] | [Campaign Type] | [Match or Target]
Bottle Opener | Phase 1 | Sponsored Products | Exact
Bottle Opener | Phase 1 | Sponsored Products | Product Targeting
Example 3: Weekly launch optimization checklist
- Wait 7 to 14 days after your first sale before optimizing.
- Week 1: optimize using the last 14 days of data.
- Week 2: optimize using the last 21 days of data.
- Week 3: optimize using the last 30 days of data.
- Keep expanding until your routine reaches a stable 60-day window.
FAQs
Q1: How long does Phase 1 last?
A: A simple milestone is reaching 20 reviews. For some categories, it may be closer to 10 reviews, while for very competitive categories, it may be closer to 50.
Q2: Should I run an auto campaign on day one?
A: Usually no. Auto targeting tends to perform better after Amazon has more conversions and keyword data for your listing, which is why Phase 2 is often a better timing.
Q3: When should I start optimizing after launch?
A: Start 7-14 days after your first sale. This reduces the risk of cutting targets before purchases have time to catch up.
Q4: Why not optimize using only the last two days?
A: Recent data can be incomplete because purchases may happen later, and reporting can change. A longer window is calmer and more reliable for launch decisions.
Q5: What if I am not brand-registered?
A: You can still launch successfully using Sponsored Products as your foundation. Prioritize clean manual targeting, consistent optimization, and strong inputs from SellerSprite Seller Tools.
Summary and Next Steps
A successful PPC launch is not random. Phase 1 buys rank and reviews with a clear target ACoS. Phase 2 transitions toward efficiency without cutting future winners too early. Phase 3 locks in breakeven and scales what works.
Keep the system simple, commit to the weekly routine, and trust the compounding effect of clean structure. Momentum is built by consistent action.
Next step action checklist
- Write down your breakeven ACoS and set your Phase 1 target ACoS at 2 times breakeven.
- Launch your Phase 1 campaign stack with clean manual targeting and disciplined bids.
- Wait 7-14 days after your first sale before making optimization changes.
- Begin weekly optimization and expand the lookback window until you reach a stable 60-day routine.
- Use SellerSprite Keyword Research, Keyword Mining, and Reverse ASIN to improve inputs and speed up learning.
- Ask questions in the SellerSprite Discord and the SellerSprite Facebook Group if you want feedback on your structure.
Share Your Sourcing Journey With SellerSprite Community
Join the SellerSprite community on the Facebook Group to share your sourcing journey, ask questions, and get support from fellow Amazon sellers.
View The SellerSprite Course Directory
Ready for the next step? Open the SellerSprite Academy course directory to continue building your Amazon FBA skills chapter by chapter.
About the author
SellerSprite Team publishes practical, execution-focused playbooks for Amazon sellers, combining platform workflows, SellerSprite Seller Tools, and reusable templates so you can scale with fewer mistakes.